I have a love for words and a knack for SEO – and as a mama, I know just how challenging it can be to run a business while raising a family. This blog is just one of the many resources you’ll find here that’ll help you boost your online visibility without sacrificing your sanity.
Thanks for being here (and I hope you’ll stick around).
Mckayla
categories
blogging
seo
Business
free seo checklist
get your checklist
explore
case studies
to the shop
work with us
follow us on instagram
share
Get access to six simple things you can do in 15-minutes or less to improve your SEO and get your website (and content) to show up in search.
Anytime you make changes to your website pages, you risk needing to move a URL. URLs are permanently moved through 301 redirects, which direct old URLs to a new URL. Here’s how to set up 301 redirects in Showit and seamlessly forward traffic from your old pages to your new ones (without losing your SEO).
In all reality, not every update you make to your website is going to end up with you creating a 301 redirect. But, when you change pages or remove pages, you can’t have visitors or Google hitting a 404 error. 301 redirects prevent 404s and that negative hit on your website’s performance.
You can set up redirects on every website platform, just by doing it a little differently. For today, were going to talk about how to set up these permanent redirects specifically on the Showit platform:
How to Set Up 301 Redirects in Showit: A Step-by-Step Guide
The first step in setting up 301 redirects in Showit is to figure out the links you want to redirect. If you’re removing a specific page or altering a page’s old URL and need to redirect to the new URL (like when you’re making your URL more SEO-friendly), go ahead and move to the next step. But, if you’re planning on setting up 301 redirects to help with your user experience and SEO, you’ll need to identify the broken backlinks you have on your website.
You can do this by going to a free broken backlink checker and checking your domain for broken links. Through this, you’ll be able to see any broken links that you may have on your website and create redirects for them.
Now, let’s talk about how to set up your 301 redirects in Showit. If you’re a video person, check out my quick YouTube walkthrough on how to fix your broken links on Showit. I have it set to start at 4:55 when I’m setting up the 301 redirects in the Showit backend:
If you prefer images and a step-by-step visual walkthrough, follow the directions listed below to learn how to set up your Showit redirects:
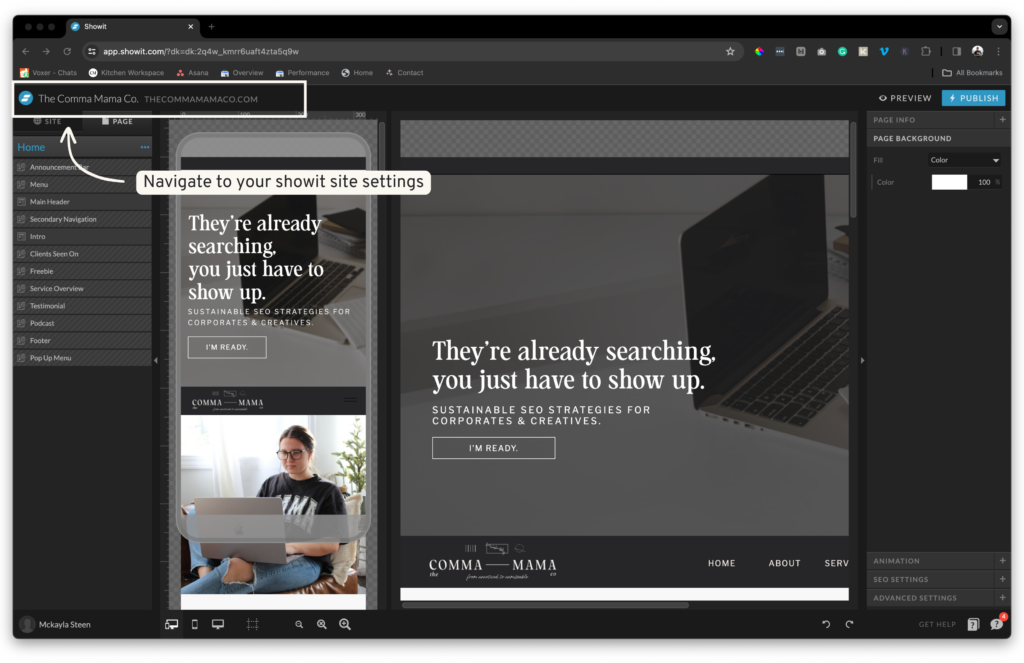
Step #1. Log in to Showit and Go to Your Site Settings

You can navigate to your site settings quickly by clicking your business/website name in the top left corner. Alternatively, you can click on your site and then click on ‘site settings’ – both will take you to the same place.
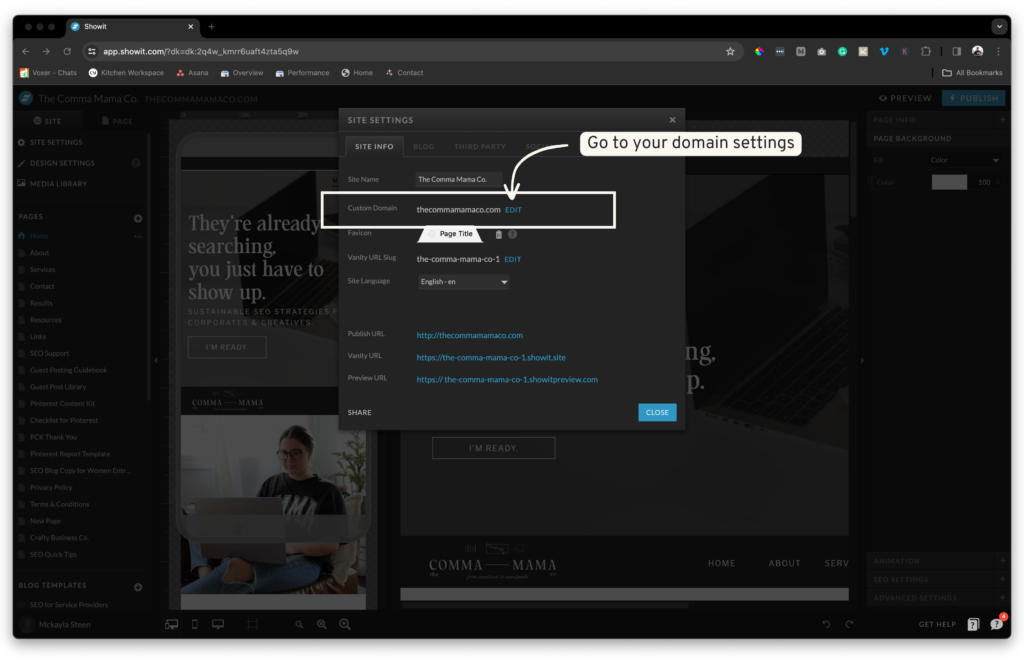
Step #2. Go to Your Domain Settings

Click ‘Edit’ by your domain in Custom Domain, this will give us access to your subdomains and primary domain for your website.
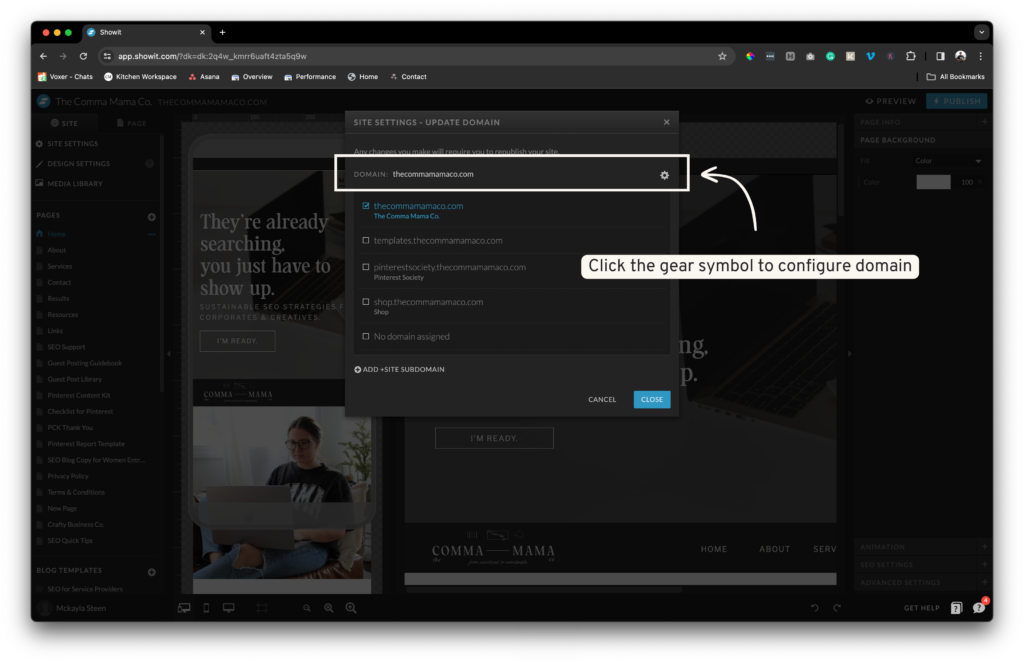
Step #3. Go to Configure Your Domain

Next, you’re going to click on the gear symbol by your domain to configure your domain and see your current (if any redirects) and where to set up a new 301 redirect.
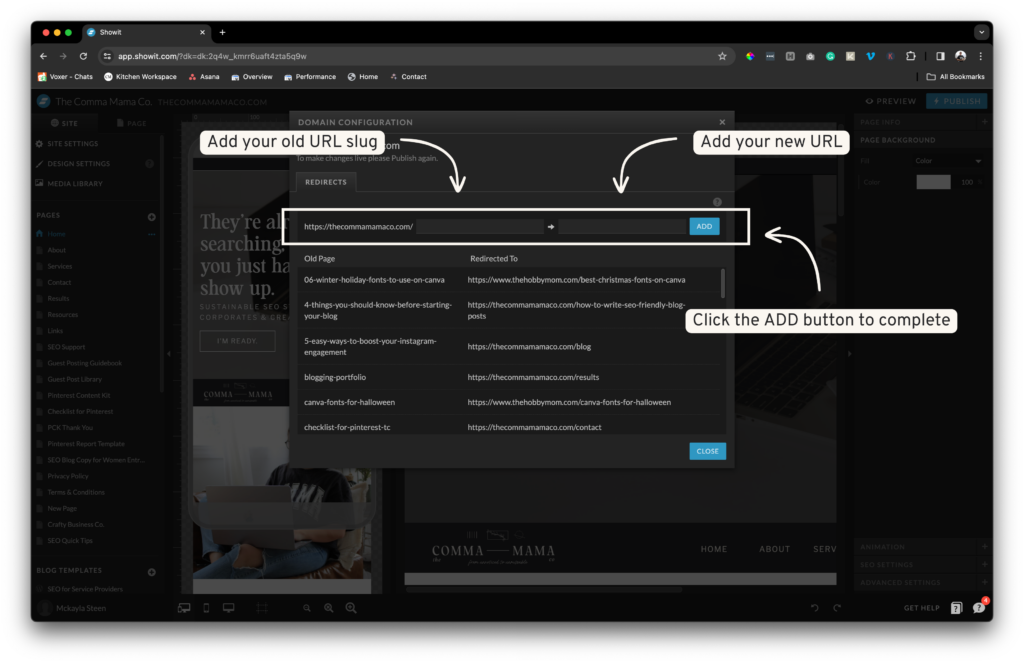
Step #4. Add Your Old URL Slug and the New URL to Redirect to

Domain Configuration is how you can set up your 301 redirects in Showit. First, you will add your old URL slug (the one you want to redirect from) in the left box. Next, you’ll add the FULL new URL that you want the old one to redirect to in the right box. Once both are added, click the ADD button to complete.
Congrats!! Now you know how to set up 301 redirects in Showit!
Why Are 301 Redirects Important? How Do 301 Redirects Impact SEO?
301 redirects play a pretty huge role in user experience, maintaining link equity, and maintaining your indexing and crawlability. It’s also important to note that you should create redirects one-on-one and any other tactic should be done on a case by case basis or you can risk it negatively affecting your SEO.
Most websites will at one point or another need to create a 301 redirect. As your business or blog grows, you’ll find that some pages need to change or be removed – which will require a 301 redirect to send that old URL to a new, more relevant one.
A 301 redirect is not a bad thing to have and is mostly good for SEO when used appropriately. Keep in mind that 301 redirects are not the only way to modify your URLs. Rather than a 301 redirect, you could set up a temporary 302 redirect and meta refresh.
If you need help optimizing your website for SEO and identifying potential SEO errors, reach out about our SEO audits + optimization, a full breakdown of your site and content SEO health and how to fix it!
Reader Etiquette
© - Content and images in this blog are copyright this blog unless stated otherwise. Feel free to repost or share images for non-commercial purpose, but please make sure to link back to this website and its original post.
℗ - We do not store any information about your visit to our website other than for analytics and optimization for content and reading experience through the use of cookies.
c/o - Our site does at times contain paid advertisements, sponsored content, and/or affiliate links.
You might want to check these out too while you're at it
categories
blogging
SEO
business
It's me, hi! Your SEO bestie.
get to know me
work with us
//
services
//
case studies
//
Mom of three, lover of all things blogging, and borderline obsessive coffee drinker — I also just happen to love making complicated things simple and accessible, especially when it comes to SEO. The blog is a collection of what I've learned from years of testing, trial and error, and working with amazing clients with impactful businesses (just like yours). Blogging and SEO doesn't have to be boring — and it definitely doesn't need to be difficult.
Mckayla
get your checklist
Want to improve your website SEO in one afternoon? This free resource offers 6 actionable steps you can take in 15 minutes or less to instantly improve your SEO.


