


I have a love for words and a knack for SEO – and as a mama, I know just how challenging it can be to run a business while raising a family. This blog is just one of the many resources you’ll find here that’ll help you boost your online visibility without sacrificing your sanity.
Thanks for being here (and I hope you’ll stick around).
Mckayla
categories
blogging
seo
Business
free seo checklist

get your checklist
explore
case studies
to the shop
work with us
follow us on instagram
share
")
Get access to six simple things you can do in 15-minutes or less to improve your SEO and get your website (and content) to show up in search.
One of the most common questions I get when helping clients set up a blog is how to set up their categories. While there are categories I recommend starting with, we’ll explain exactly how to set up categories in a Showit blog using your WordPress backend.
This is an easy or beginner-level task that anybody can do. The basic WordPress dashboard, in combination with the Showit website platform, is meant to be user-friendly, so you can feel confident going in — even if you’re not a Showit or WordPress pro!
And, if you’re planning on blogging for your business, knowing how to set up your categories is extremely helpful in the long run.
Before we dive in, I just wanted to quickly mention that there are actually two methods you can use. The first is the preferred method, but the second is a quick and easy substitute!
Here’s the step-by-step walkthrough on how to set up categories in a Showit blog:
How to Set Up New Categories in Your Showit WP Backend
The first and preferred method for setting up and creating categories for your Showit blog is to navigate to the categories section from your Showit WP backend. Showit has a partnership with WordPress, meaning you have a Showit website with a WordPress-hosted blog.
This method allows you to customize your URL/slug, add a description, and, if you have the Yoast (or similar SEO plugin), customize your Page title and meta description.
Keep in mind that if you change or delete your categories in the future, you may create a broken link or error 404. To prevent this, try keeping your slug simple so that you can easily modify the category name without deleting it. If you do have to delete your category, set up a 301 redirect to save your link’s equity and maintain your user experience.
Here’s a quick step-by-step walkthrough:
#1. Navigate to Categories in Your Showit WP Dashboard
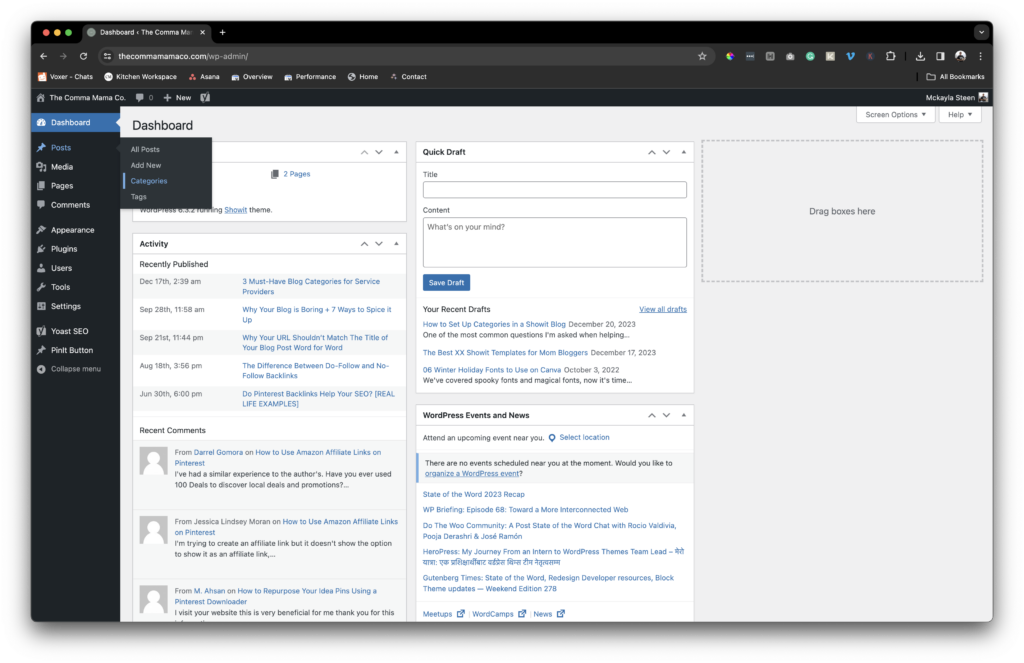
You’ll need to log in to your Showit WordPress backend. Typically, you can do so by going to www. yoururlhere .com / wp-admin. Next, you’re going to get to your Categories section by going to your left side panel, hovering on posts, and clicking on ‘Categories’ from the menu.
#2. Add Your Category Name
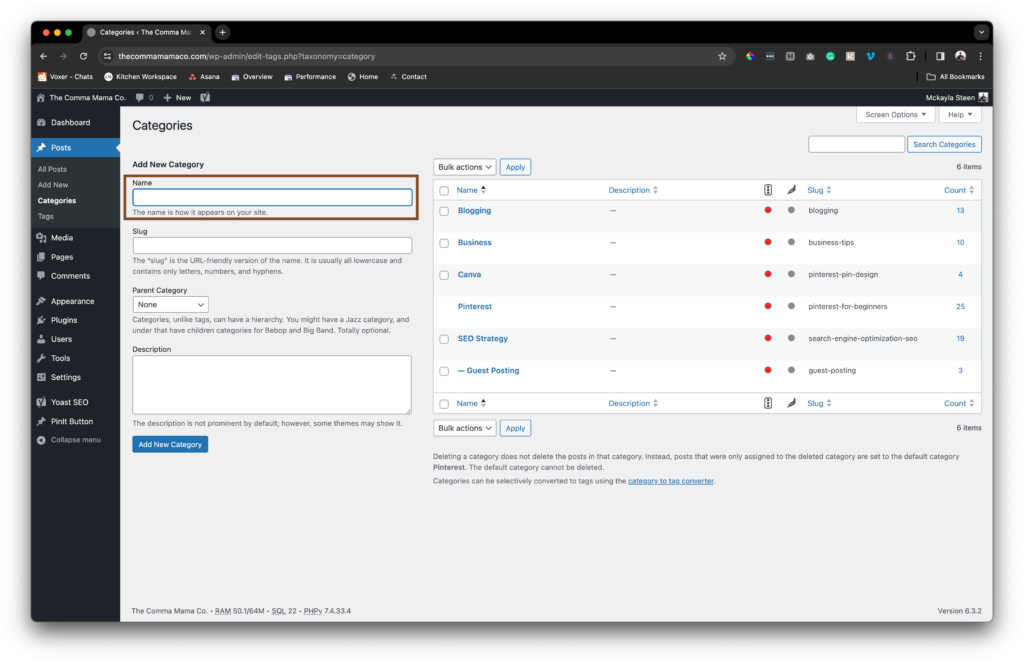
Your category name should only be one to three words and should be a higher-level description or section of what you plan to write about in your blog. If you need some ideas on what categories you should create first, try using these three categories for service providers.
Try not to replicate a page that already exists on your website, which can lead to duplicates in your page titles, which are not great for SEO and can be confusing when Google goes to index your website.
#2. Specify Your Url
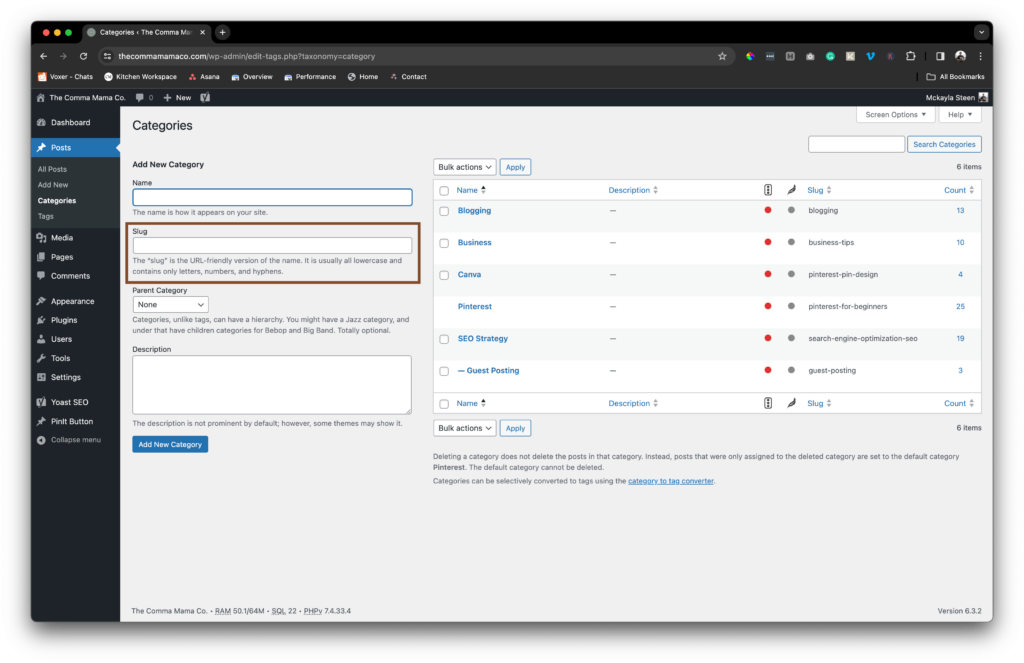
You want to keep your URL short and sweet. It should match your category name, but exclude any symbols. Follow the same practices you would for making your URL SEO-friendly for any other page for this one.
If there is a parent category, you can select it here. You shouldn’t have one when you’re just starting; they come with time and as you create more blog content.
#3. Add Your Description
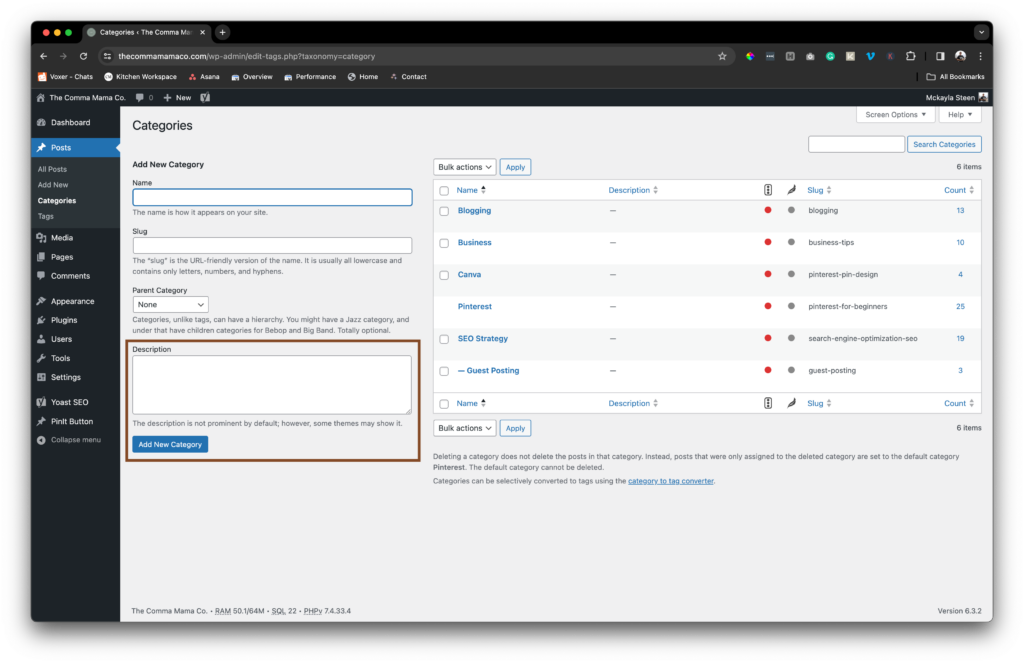
Finally, add your category description here. Your description should be 2-3 sentences and summarize what the category is about and what you plan to include. You can also specify who the content is for, such as coaches, bloggers, doulas, moms, etc.
Once your description is complete, hit ‘Add New Category‘ to finish it up!
How to “Quick Add” Categories in Your Showit Blog Posts
The second way to add categories in Showit is to ‘quick add’ them to your blog posts while you’re writing or publishing. This method is a quick alternative when you’re not up to creating and optimizing a new category, but it does create more work later.
It’s also not preferred because you can quickly forget that you didn’t optimize the category — it just sits on your site!
Here’s what to do:
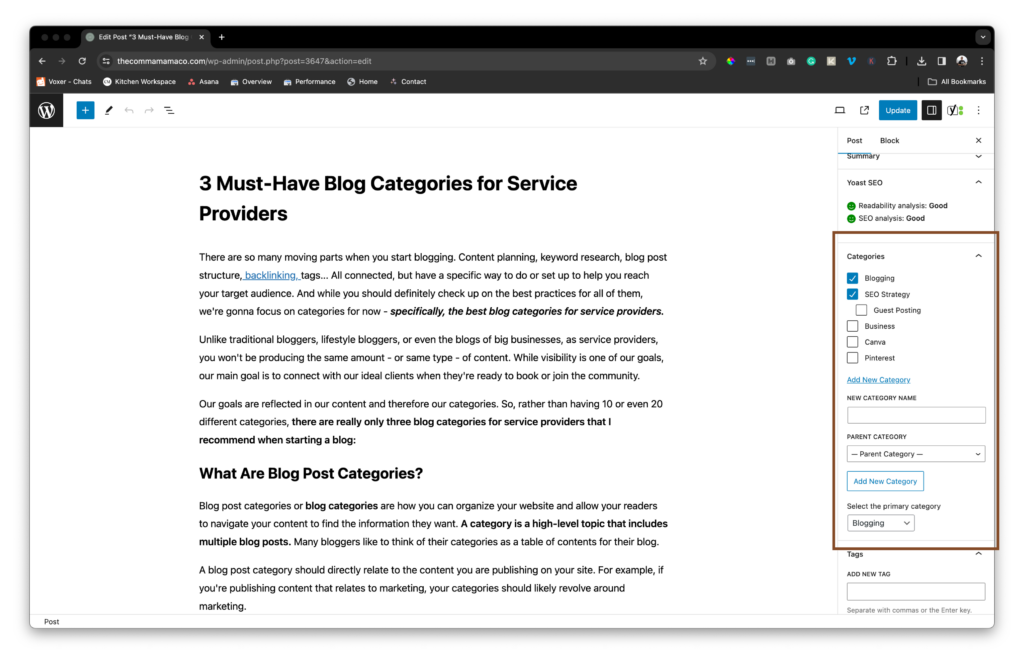
While you’re in your blog post, open your settings panel (mine is located on the right side) and scroll down to your Categories section. Click on ‘Add New Category,’ fill out the New Category Name, and select a parent category if you have one.
Once you fill out those two things, you can select the Add New Category button. This will also automatically apply the category to the blog post.
Why Are Categories Important for Blogs? How Do They Affect SEO?
Categories are a great way to tell readers what your blog is about and find other blog posts that share similar information. You can also use categories to sort by location or audience type, allowing a more personal approach to sharing your content.
Just like with your readers, categories give Google a heads-up on what your content is about and what type of content it can expect. When you optimize category pages for SEO, they can also rank in search, providing support for similar keywords on the site and improving your overall SEO.
Reader Etiquette
© - Content and images in this blog are copyright this blog unless stated otherwise. Feel free to repost or share images for non-commercial purpose, but please make sure to link back to this website and its original post.
℗ - We do not store any information about your visit to our website other than for analytics and optimization for content and reading experience through the use of cookies.
c/o - Our site does at times contain paid advertisements, sponsored content, and/or affiliate links.
You might want to check these out too while you're at it


categories
blogging
SEO
business

It's me, hi! Your SEO bestie.
get to know me
work with us
//
services
//
case studies
//
Mom of three, lover of all things blogging, and borderline obsessive coffee drinker — I also just happen to love making complicated things simple and accessible, especially when it comes to SEO. The blog is a collection of what I've learned from years of testing, trial and error, and working with amazing clients with impactful businesses (just like yours). Blogging and SEO doesn't have to be boring — and it definitely doesn't need to be difficult.
Mckayla
get your checklist
Want to improve your website SEO in one afternoon? This free resource offers 6 actionable steps you can take in 15 minutes or less to instantly improve your SEO.


